Notification texts go here Contact Us All Tools!

How to Add Stylish Custom Footer Section in Blogger

Adding a stylish custom footer section to your Blogger website can help improve its appearance and make it stand out from the crowd. With some basic knowledge of HTML and CSS, you can create a footer section that is both functional and visually appealing. In this article, we will guide you through the process of adding a custom footer section in Blogger.

First impressions are everything, especially when it comes to websites. Having a custom footer section on your Blogger website can give it that professional and unique touch that visitors will remember.

Add Stylish Custom Footer Section in Blogger

It is important to have a footer section for a stylish website. Because Footer Section makes the website more beautiful. Now you can see the footer section of almost all websites. This footer section contains links to some important pages of the website. This allows the user to easily find those pages.

What is a custom footer section in Blogger?

A custom footer section in Blogger is a section at the bottom of your blog where you can add your own content, such as text, images, links, or even HTML and CSS code. This section is typically located below the main content of your blog and above the blog's standard footer.

The three most important things to keep in mind when creating a custom footer section in Blogger are:

  1. You should aim to create a design that is consistent with the rest of your blog's aesthetic.
  2. Your custom footer section should include information that is relevant to your blog and your audience.
  3. Be mindful of the size of your footer section, as a footer that is too large or cluttered can be overwhelming for your readers.

Add Stylish Custom Footer Section in 4 Steps

Step 1 : You have to go to the Deshboard of the blogger website. Now go to Edit Html in the Theme menu.

Add Stylish Custom Footer Section in 4 Steps

Step 2 : Copy the html code below. Paste the copied html code before the </body> tag. And change where you need to change.

Step 3 : Copy the css code below. Paste the copied css code before the ]]></b:skin>.

Add Stylish Custom Footer Section in 4 Steps

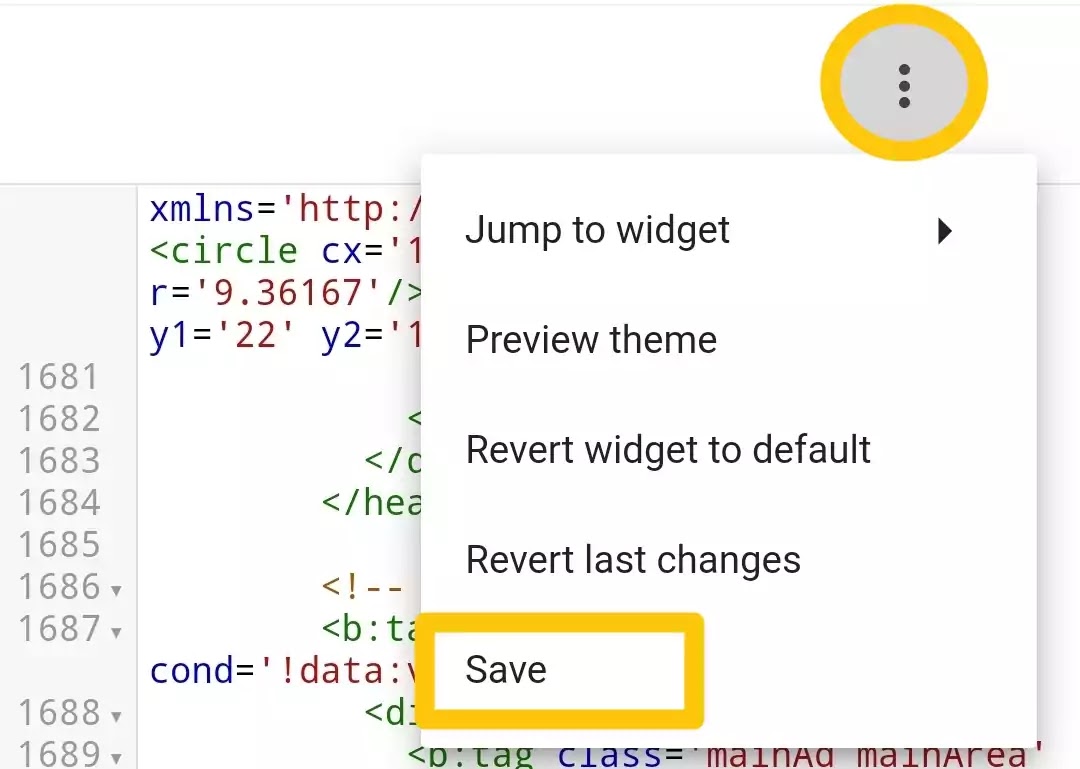
Step 4 : Save the theme by clicking the save button.

Add Stylish Custom Footer Section in 4 Steps

Stylish Custom Footer html Code


<footer>

<div class="footer-container">

<div class="footer-left">

<h4>Quick Links</h4>

<ul>

<li>

<a href="#">Home</a>

</li>

<li>

<a href="#">About</a>

</li>

<li>

<a href="#">Contact</a>

</li>

<li>

<a href="#">Privacy Policy</a>

</li>

</ul>

</div>

<div class="footer-right">

<h4>Follow us on</h4>

<div class="social-icons">

<a href="#">

<img src="https://img.icons8.com/plasticine/100/000000/facebook-new.png" alt="" />

</a>

<a href="#">

<img src="https://img.icons8.com/ios/100/000000/twitter-squared.png" alt="" />

</a>

<a href="#">

<img src="https://img.icons8.com/cotton/100/000000/instagram-new.png" alt="" />

</a>

</div>

<p>This website is managed by Mironiyar</p>

</div>

</div>

</footer>

Change some parts of the code :

Home : Paste the 'Home' link instead of #.
About : Paste the 'About' link instead of #.
Contact : Paste the 'Contact' link instead of #.
Privacy Policy : Paste the 'Privacy Policy' link instead of #.

Stylish Custom Footer css Code


/* Footer */

footer {

background: #000;

color: #fcfcfc;

font-family: "Roboto", sans-serif;

padding: 36px;

}

footer a {

color: #fcfcfc;

text-decoration: none;

}

footer a:hover {

text-decoration: underline;

}

footer .footer-container {

display: flex;

width: 900px;

margin: 0 auto;

}

footer ul {

list-style: none;

margin-top: 16px;

padding-left: 10px;

}

footer ul li {

margin: 12px 8px;

}

footer .footer-left {

padding-right: 100px;

border-right: 1px solid #c4c4c4;

}

footer .footer-right {

padding-left: 100px;

}

footer .social-icons {

margin-top: 16px;

}

footer .social-icons a {

text-decoration: none;

}

footer .social-icons img {

margin: 0 16px;

}

footer .social-icons img:first-child {

margin-left: 0;

}

footer .footer-right p {

margin-top: 32px;

}

The most important thing is to follow the above four steps. If a step is omitted, the Footer section will not appear.

FAQs:

Can I add more than one custom footer section to my Blogger website?

Yes, you can add multiple custom footer sections to your Blogger website. Just create a new HTML file for each custom footer section and follow the same steps to add them to your Blogger theme.

Can I use a pre-made footer design for my Blogger website?

Yes, there are many websites that offer free or paid footer designs that you can use for your Blogger website. Just make sure to choose a design that fits the overall design of your website.

Will adding a custom footer section to my Blogger website affect the loading time?

It depends on the size and complexity of your custom footer. However, if you keep your custom footer simple and don't add too many large files or images, it should not have a significant impact on your website's loading time.

Can I edit my custom footer section after I have added it to my Blogger theme?

Yes, you can edit your custom footer section at any time by going to the "Edit HTML" section of your Blogger dashboard and making changes to the HTML code.

Can I remove the default Blogger footer section after adding a custom footer section?

Yes, you can remove the default Blogger footer section by editing your Blogger theme's HTML code and deleting the default footer section code. However, we recommend keeping a backup copy of your original HTML code in case you need to revert back to it in the future.

Can I use CSS to style my custom footer section?

Yes, you can use CSS to style your custom footer section. You can add CSS code to your Blogger theme's "Custom CSS" section or add it directly to your custom footer HTML code. This will allow you to change the font, color, and other style properties of your footer.

Conclusion

In conclusion, adding a custom footer section to your Blogger website can help improve its appearance and functionality. By following the steps outlined in this article, you can create a custom footer section that is both stylish and informative. Remember to customize the HTML and CSS code to match your website's design and needs. With a little effort, you can create a professional-looking website that visitors will remember.

Post a Comment

Cookie Consent
We serve cookies on this site to analyze traffic, remember your preferences, and optimize your experience.
Oops!
It seems there is something wrong with your internet connection. Please connect to the internet and start browsing again.
AdBlock Detected!
We have detected that you are using adblocking plugin in your browser.
The revenue we earn by the advertisements is used to manage this website, we request you to whitelist our website in your adblocking plugin.
Site is Blocked
Sorry! This site is not available in your country.